Online shoppers nowadays expect more than just static images. They want full control, clarity, and the feeling of virtual touch. And with 360 product photography, you can give it all to them.
A few years ago, I saw my favourite smartwatch brand fail and close its stores because it failed to acknowledge that 360 product photos are the new era. With so many brands rising, you must showcase every curve, every detail, and every uniqueness your product has. Without that, your brand will be just another traffic on the web. But why and how 360 product photography became so necessary, and what are the best practices the successful brands are using, you might ask!
In this guide, we will look into every detail of that and provide the tips you need to succeed in 360 product photography. So let’s jump in!
Table of Contents
ToggleWhat is 360-degree Product Photography?
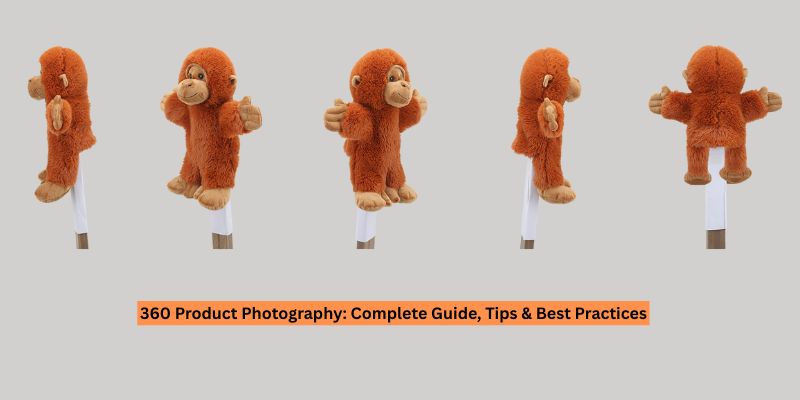
360 product photography is a technique in which multiple images of a product are captured from every angle and then combined into an interactive 360-degree spin.
This process involves photographing a product in full rotation so customers can see every angle. Usually, 24, 36, or 72 frames are taken, so shoppers can rotate and view the product from every possible angle. This is a great way to showcase every corner of the product, especially if your products contain intricate details. When you use a rotating image instead of a static image, this creates an interactive experience where users can click, drag, or spin the products. This also provides a virtual touch experience, as if the shoppers can touch and control the product.
How do 360 product photos work in practice?
- The product is placed on a turntable.
- The turntable is rotated in small and equal increments.
- Pictures are taken in each step as the table rotates.
- When all sides are captured, all the images are stitched together into a 360-degree viewer.
The final result is a product image that feels real, transparent, and trustworthy. With such images, customers can inspect every tiny detail, texture, and every curve. This is why 360 product images have become so popular among customers. They can purchase with confidence, not in complete blindness.
Difference Between 3D Photography and 360 Product Photography?
360 product photography is a sequence of real photos stitched into a single-axis interactive photo that can be spun. In contrast, the 3D product visualisation is a modelled or reconstructed object that supports full 3-axis viewing, dynamic lighting, and programmatic interactions.
However, there are many more differences between these two. Here’s how 3D and 360-degree product photography differ from each other:
| Aspect | 360 Product Photography | 3D Product Photography |
|---|---|---|
Basic Definition | A sequence of real photographs stitched together to create a rotatable product view. | A digitally created or reconstructed product that exists as a true 3D object. |
Core Concept | Products are photographed on a turntable from multiple angles and then stitched with software. | Modelled using 3D software or reconstructed via photogrammetry or CAD. |
Data Source | Camera-captured raster images. | Polygonal mesh, textures, materials, and lighting data. |
Output Format | A series of 2D images that are played in sequence. | Interactive 3D model or fully rendered scene. |
Axis of Movement | Mostly single-axis rotation (left–right spin); multi-axis possible but complex. | Full 3-axis rotation (X, Y, Z) with free movement. |
Viewing Freedom | Limited to predefined angles that were captured during shooting. | Unlimited viewpoints, zoom levels, and camera paths. |
Interactivity Level | Basic interaction: spin, pause, sometimes zoom. | Advanced interaction: rotate freely, explode parts, change colors, materials, or lighting. |
Lighting Control | Fixed the lighting exactly as it was during the shoot. | Dynamic and adjustable lighting even after creation. |
Customer Experience | Gives a realistic “all-around look” of a real product. | Feels immersive and exploratory, closer to AR/VR experiences. |
Editing & Retouching | Done frame-by-frame; consistency is critical to avoid flicker. | Asset-based editing; changes require model updates or re-rendering. |
Post-Production Effort | Moderate; depends on the number of frames and cleanup. | High; involves modelling, texturing, rendering, and optimization. |
Cost per SKU | Lower cost; efficient for large catalogs. | Higher upfront cost, especially for photorealistic models. |
Scalability | Easy to scale using automated rigs and studio workflows. | Slower to scale due to modelling and rendering time. |
Reusability | Limited to a single product. | Highly reusable across web, AR, VR, configurators, ads, and games. |
Best Use Cases | E-commerce product listings, fashion, and simple consumer goods. | Configurators, complex products, AR/VR, marketing visuals, pre-production launches. |
Realism | 100% real product appearance. | It can be ultra-realistic, but it depends on the modelling quality. |
Future Flexibility | Limited once images are captured. | Very high; easy to update colors, parts, or designs digitally. |
Types of 360 Product Photography
360 product photography is not a single term; it’s more of an umbrella term. There are various 360 product photography types depending on the budget, product shape, and platform requirements. Here they are:
Single-Row 360 Spin
This is the most common and cost-effective 360 product photography format. The product is usually placed on a motorized turntable and is photographed in a single horizontal rotation. Usually, 24 to 27 frames are taken, as the product rotates in a horizontal plane.
With the single-row 360 spin, you get a smooth left-right spin that shows all sides of the product at eye level.
This type of product photography is generally used for cosmetics & skincare, shoes, bottles/jars/cans, electronic items, fashion accessories, and any product where height details are not that critical.
With single-row 360 spin photography, you can get the fastest shooting and editing experience. This is the least expensive type of 360, so you would not have to spend a fortune on this. Another great aspect is that you can use it on all ecommerce platforms. Providing customers with a complete perimeter view helps you better manage them. Research shows that shoppers love to inspect product labels, shape contours, and details from every single angle. By providing a single-row 360-degree spin product photo, you can better meet customer expectations.
Multi-Row 360 Photography
In multi-row 360 photography, the product is shot at multiple verticals instead of rotating only horizontally. With this type of photography, you can take photos from above, from the centre, and from below. The camera moves at different pitches while the turntable rotates. Users can rotate the product both horizontally and slightly tilt it up and down.
Multi-row 360 photography is used for helmets, backpacks, luxury handbags, watches, home decor, and sports gear.
With this type of product photography, you can show product features on top and bottom that matter for buying decisions. It is also suitable for premium or technical items. Increasing the time on page, this type of image helps increase engagement and conversion on your ecommerce platform.
Multi-row photography is the middle ground between regular 360 spins and a full 3D model.
Spherical/Hemispherical Product Photography
This is the most complex form of 360 product photography. The camera moves around the product in a complete sphere, capturing every possible angle, much like a simplified 3D model. Users can drag the products in any direction to see the object from nearly any point in space when the images are taken in a spherical/hemispherical format. The more angles are included in the photo, the more realistic it looks.
The spherical product photography is great for mechanical components, collectibles and figurines, high-end luxury handbags, footwear, premium electronics, or products with complex curvature.
With spherical product photography, you can get ideal images for items where the shape and form matter. It encourages trust by mimicking in-store inspection and gives customers a high-end feel.
This type of photography is generally used by ecommerce owners who want to stand out or sell high-ticket items.
Non-interactive 360° Animations
The non-interactive animation does not provide a user-controllable viewer; you will export the 360 frames as a pre-rendered video or GIF. The product rotates automatically, so customers do not need to touch and rotate it. This is the simplest way to showcase rotating products without viewer interaction.
This is best for social media ads, product teasers, marketplaces that don’t support interactive video or 360, homepage banners, and email marketing.
With this type of 360-degree product photography, you can create a lightweight, easy-to-share product image that is also great for attention-grabbing posts. As it requires no special software to view, your hassle is reduced. The animation plays everywhere, making it easy to grab customers’ attention.
Non-interactive animation works the best as a marketing asset, not as a product detail view.
Interactive 360° Spin
This is the classic 360 product photography used on ecommerce platforms. Here, users can manually drag to rotate the product. The frames are loaded into a spin viewer on your website. It gives customers full control and dramatically increases their confidence, especially in the fashion and electronics industries.
Studies show that interactive views are the reason for increased add-to-cart clicks, as shoppers feel more confident and informed with this level of control. It is best for almost every ecommerce site, especially fashion, tech gadgets, tools, automotive parts, and premium items. Here, confidence is the key.
Interactive 360 spin photography helps increase user engagement, improve product understanding, and reduce customer returns, creates a premium experience for customers, and also makes them psychologically attached to the product, so they are more likely to buy it.
360 Video Clip Animations
The 360 video clip animation is a continuous-motion video of the product spinning, filmed in real time. It is not frame-by-frame photography; instead, a video is taken. The video captured shows real-time reflections and dynamic shadows better than any other form.
Evidence also shows that natural light is crucial for products when pursuing premium photography. The video clip animations replicate light better than any other form.
This form of 360 video is great for jewelry that has sparkle and shine, watches, shoes with textured materials, or anything where movement and light play a big role.
Using the video clip animation, you can show realistic reflections and dynamic textures of products. It would be easier for storytelling and playing with light and shadow. It is also ideal for short-term content platforms.
360 video clips are mostly used for marketing; they are not suitable for ecommerce product pages.
Essential Equipment for 360 Product Photography
To master the 360 product photography, you need a turntable, consistent lighting, a stable camera setup, and proper software to capture smooth, high-quality photos.
A perfect 360 product photography setup is not built on expensive equipment; instead, it relies on essential, precise, and consistent equipment. Every piece of equipment plays a vital role in this type of photography. Here is the complete set of essential equipment you need for 360 product photography:
Motorized Turntable
A motorized turntable is essential to ensure the product rotates at a uniform speed or in repeatable increments, resulting in a smooth spin and outcome.
To find the best motorized turntable for your 360 product photography, ensure it has step accuracy and stops at 24, 36, or 72 for clean animation. The turntable must have enough load capacity to handle your product’s load. If your products are heavier, use a stronger turntable for 360 product photography. A non-slippery surface is non-negotiable to get the perfect shot. Having a remote or automated turntable would be even better.
Pro tip: If you shoot for a reflective product, choose a turntable with a gloss or acrylic top to reduce visible texture.
A Stable Camera and Lens Setup
A stable camera is one of the most essential pieces of equipment in the whole setup. If your camera moves once you start shooting, it can misalign the whole image.
To have a stable camera setup, you don’t need the most expensive models; you just need a camera with full manual control, excellent sharpness, clean results even at low ISO, and fast tethering support.
As for a stable camera recommendation, I would say a mirrorless camera from Canon, Sony, or Nikon is more than enough to get a good shot.
As for the lens, you need to have different lenses for different product sizes. For small to medium products, 50mm prime lenses are a good choice. For jewelry or detail items, you can choose an 85mm prime lens. For versatility, get 24-70mm zoom lenses. Lens selection is also crucial for 360 product photography, as it defines your product’s proportion accuracy and helps customers get a real sense of the product.
Tripod or a C-stand
A solid tripod or C-stand makes sure your camera doesn’t move while shooting, maintaining a fixed perspective throughout. If the camera angle shifts even for 2 degrees during shooting, the 360 spin can wobble, and it is one of the biggest quality killers.
To achieve perfect 360-degree product photography, you need a stable tripod that has enough weight to hold the camera still, can be adjusted to your desired height, can lock pan and tilt, and has no micro-vibration.
By using a tripod that would genuinely support the spind and enable multi-angle shots at a stable level, your product photos would come out perfect, with no shaky corners or cuts.
Continuous Lighting
Lighting is crucial for 360 product photography. You need soft, even, shadow-controlled light across the entire studio where the photos are being taken. If the lighting is uneven and uncontrolled, the product will appear flickery during rotation.
To achieve a continuous lighting setup, you can get two or four softboxes positioned symmetrically. Continuous LED panels for heat-free shooting are also needed. For smaller reflective items, you should use a light tent. Use a reflector to minimize harsh shadows in your photos.
Pro Tip: Use CRI 95+ LEDs to maintain consistent color accuracy across all frames.
Shooting and Editing Software
Without essential software, your 360 photos cannot come to life. Some software is just non-negotiable for the 360 photos. Without these images, they will remain just images and will not turn into an interactive 360 photo. But first, you must use a neutral, consistent background to ensure accurate colors and fewer editing challenges. With that done, you should have essential software, such as tethering software, to preview each shot before any issues arise, a 360 capture & viewer (Sirv, WebRotate 360, Orbitvu) to stitch all the frames.
How to Capture 360-Degree Product Images: A Quick Guide
Capturing 360 product images requires precise setup, consistent lighting, and fixed camera positioning. The process is more about having repeatability and consistency. Here’s a quick guide on how to capture 360-degree product images:
Step 1: Prepare the Products
Start by cleaning the products thoroughly. Dust, fingerprints, and scratches should all be removed very well. Because with 360 product photos, all these get painfully visible. As every detail is captured from every angle, having these impurities on your product would only make it look untidy and non-professional. To get the perfect shot, clean your product and prepare it for the next steps.
Step 2: Position the Products Perfectly
After your products are cleaned and prepared, you would need to adjust the placement. Take your turntable and adjust the products at the very center of it. Why is it important? Because the 360 product photos would be taken from multiple sides, placing the product in the center would make it easy to maintain a perfect horizon. As it would be in the center, there is no way your photos would come out wobbly or misaligned during rotation. Also, it seems to drift as the turntable rotates when placed off-center.
Step 3: Lock the Camera Position and Settings
The camera setup is the one crucial step that requires more time. You would need to mount the camera securely and ensure it doesn’t move once shooting begins. If you choose a manual camera, set it up by keeping the ISO low, ensuring the Aperture is at a narrow setting, and setting the shutter speed to 1/125 to 1/250 second to freeze the moment. You can adjust it based on your needs and product types. I would not suggest auto-setting the camera, as it can introduce exposure or color shifts that disrupt visual continuity in the spin.
Step 4: Set up Even, Diffused Lighting
For 360 product photography, you need to aim for soft, shadowless, and consistent lighting. For that, you can use multiple diffused light sources, such as LEDs or Strobes, to eliminate harsh shadows. It would also evenly illuminate the product from all angles as you spin it. You can also follow either the 3-light setup or the Halo-light setup to achieve the best results. Use black cards/flags to block light and control spill. However, the core principle is to maintain consistent lighting so it remains the same throughout the shooting.
Step 5: Shooting All the Images
Now that all the setup is done, start shooting. Take your first photo, then rotate the turntable in small, even increments. Take a photo of each step and do not miss any area. It is best to take 24 to 36 images for a smooth, break-free 360 view.
The more angles you take of the product, the easier it is to stitch everything together and get the perfect shot.
Step 6: Post-processing and Publishing
Import all the images into an editing software, go through them very carefully, and look for any imperfections or issues you might find. Any wobbly or flickering images must be eliminated. Adjust the color, contrast, and brightness to ensure the product appears consistent in all the frames. After that, use a 360 product photography software to stitch the images into a single interactive viewer. Just export it in a web-ready spin format and publish it on your website.
Best Practices for High-Quality 360 Product Photography
You must prioritize consistency over anything else, control reflections and highlights efficiently, and use the right number of frames. There are many more aspects you need to keep in mind for high-quality 360 product photos. Here are a few best practices that professionals follow:
- Match the camera height to the audience’s natural view. The camera should clearly reflect how your customers would naturally see the product. It plays a vital role in providing a clear sense of where the product would be placed. For example, if you are taking photos of footwear, it is best to shoot slightly above the midline; on the other hand, shooting for electronics is often done at eye level. Incorrect camera angles can distort proportions during rotation, making your products appear taller or shorter than they actually are.
- Lighting should be designed for rotation, not for single images. Choose a lighting setup that looks good from every angle. If you consider lighting that is only good in a certain angle and falls short in others, then your 36 product images would not be visually pleasing. The process of 360 product photography needs large lighting and shadows that do not move frame by frame. Only then can a good 360 product photo be achieved.
- Adjust frame count based on product details, not just the size of the product. Many ecommerce owners make the mistake of choosing frame count based on the product size when it should be based on the product details. The more detailed product photography you do, the more frames you will need to include. For example, a smooth mug image would only need 24 frames for 360 visualization, while mechanical part would be best using 48 frames.
- Normalize exposure for consistent luminance value. In 360 product photography, minor changes can have a big impact. Because it is stitched frame by frame, a slight shift between frames can create a pulsing effect during rotation. Instead of relying solely on camera settings, professionals normalize exposure during the capture. Or sometimes they batch-adjust the luminance value to maintain a visual continuity across the entire sequence.
5 Common Mistakes to Avoid in 360 Product Photography
Common mistakes that you must avoid to ensure quality 360 product photos. Avoid relying on auto camera settings and capturing fewer frames. Here are the common mistakes you need to avoid:
- Do not rely on camera auto-settings. Auto exposure, auto white balance, and auto focus change slightly from frame to frame as the product rotates. These micro adjustments cause a visible shift in product photos. Also, while you rotate the turntable, the product color may flicker, and focus inconsistencies may appear due to the auto setting. Professionals lock all camera parameters to ensure that every frame is identical to the others.
- Using directional or uneven lighting. Having consistent lighting is non-negotiable in 360 product photography, and you cannot compromise on it. Lighting tha favors one side of the product and creates a shadow that shifts position with rotation is deadly to the image quality. In a professional setup, lighting is designed symmetrically so it remains consistent, while the shadow does not move with rotation.
- Underestimating surface reflection and glare. You must understand that reflective and glossy surfaces behave differently at each rotation angle. You cannot ignore the impact of the surface on your product images. Without proper diffusion, reflections can spike suddenly, hamper product details, or reveal unwanted elements in the pictures. For professional 360 product photos, you need to manage reflections during setup, because correcting them throughout frames in post-production would cost you a fortune.
- Capturing too many or too few frames during the shoot. Too many frames cause irregular rotation and loss of image details; too many frames increase file sizes, slowing image loading. You need to choose a frame count based on the surface complexity and iteration needs. You don’t need to determine based on the product’s size. Consider the complexity, and you will get a smooth, balanced performance.
- Skipping real-world testing is detrimental to the production of the 360 product image. Many 360 spins are approved based on large-screen testing but fail when used on mobile devices. Various issues, such as slow loading, poor touch sensitivity, or misalignment, appear. This is why you must test out your 360 spins before releasing them to your ecommerce platform. It would ensure your photos are smooth ot interact with and have a great quality.
360 Product Photography Tips for Popular Products
Footwear & Apparel
360-degree product photography is popular in the footwear and apparel industry; shoppers want to see how shoes and clothes look from all sides. Showcasing only the front or back doesn’t attract them and leaves room for confusion. Static images of footwear and apparel cannot properly showcase stitching, seams, thread patterns, and material texture. If you intend to use 360 product photography for your footwear and apparel products, here are a few tips:
- Rotate the product at eye level and slightly above to showcase all the details.
- For apparel, include subtle garment movements to show drap and shape.
- To keep clothing and shoe structures sharp, use a mannequin or foam.
Electronics
For the electronics industry, 360-degree product photos are necessary, as customers need to inspect every detail of the product to be sure of their purchase decision. With a 360 product photo, you can showcase the ports, buttons, edges, and contours of the electronic devices. A few tips for such product photography in your electronics store are:
- Use neutral lighting so it does not distract the viewer’s vision.
- Maintain consistent focus to ensure every angle is clear.
- Highlight functional details to showcase unique aspects.
Jewelry and Watches
Fine details like gems, metal texture, and cuts are the selling points for jewelry and watches. Only 360 product photos can do justice to those unique aspects. Buyers would love to inspect those to grow trust before making the purchase. Here are some tips you can follow:
- Increase the frame count when taking photos to capture more details.
- Use macro lenses to capture texture and engraving details that matter to the buyers.
- Control reflections carefully to manage shine without losing details.
Tips for 360 Product Photography Post-Production
Post-production is not optional in 360 product photography. It is what turns the normal photos into a smooth, interactive model. Some people tend to overlook it, but it is actually necessary. Here are a few tips for the post-production of 360 product photography:
- Apply global color and exposure matching. Applying batch color correction and exposure normalization at the frame level ensures every image shares the same white balance and luminance. It prevents visible flickers during rotation.
- Use an edge-aware background. A clean background in photos requires precise edge control, especially for complex product outlines. Accurate marking will prevent haloing or jagged edges that can become noticeable when the product is spun.
- You must apply standard retouching across all frames. Any changes, such as dust removal, scratch removal, or surface correction, must be applied to all frames. However, it can be too much to handle alone, and you might see various inconsistencies. I would strongly recommend getting help from a professional team like Graphic Aid to ensure your 360 images turn out top-notch.
- Avoid over-retouching product details. Too much retouching can end up smoothing or removing essential texture. It means you might lose the quality you intended to showcase firsthand. The goal of post-production should be correction, not alteration of the actual product.
Frequently Asked Questions (FAQs)
How Much Does 360 Product Photography Cost in the United States?
In the United States, professional 360 product photos typically cost $49 to $1200+ per product. For single-row photography, the cost is usually lower, starting at only $49. However, for advanced photography, such as multi-row photography, the price varies by product type.
Where to Outsource 360 Product Photo Editing Service?
Editing 360 product photos needs to be done by the best editors. To ensure frame-to-frame consistency, it’s better to hire a team of professionals like Graphic Aid. By hiring an experienced editorial team, you will be free of worry, and your product photos will turn out professional.
What is the best software for 360 product photography?
Some popular 360-degree product photography software includes Sirv, WebRotate 360, Orbitvu, and Iconasys. The right choice of software depends on your customers and product needs. It is also highly dependent on your ecommerce platform.
Which products benefit the most from 360-degree views?
Products that need to be visually satisfying and show a lot of detail. A few popular categories for using 360 product photos are footwear, electronics, jewelry, watches, and tools. These categories also see higher engagement from 360 product photos.
Conclusion
In conclusion, 360 product photos are a gem and can completely change your website game. It can make your customers feel attached to the product and make them want to buy it immediately. All you need is the right guide to start your 360 product photography journey.
No matter what your expertise is, this guide will be helpful because we have included every detail you might need to achieve a perfect 360 photo, from equipment selection to post-production tips. You will find it all here.