Do you know the eCommerce industry experiences 22% of returns only because the product doesn’t look the same as in real life?
One of the major reasons behind this problem is the inaccurate color of the products.
Imagine you have ordered a baby pink dress. But when you see it in person, it’s a soft lavender color! We know it’s heartbreaking and you would probably return it. This is happening to hundreds of customers every day. The solution to this problem is proper color correction.
In this guide, we will share step-by-step guidelines on how to do color correction in Photoshop. You will learn the two easiest photo color correction techniques, along with some important insights.
So, without further ado, Let’s dive in.
What is Color Correction in Photoshop?
Color correction in Photoshop is a color-adjusting technique. This photo editing method in Photoshop is used to make photographs look natural and aesthetically pleasing. Different factors, such as lighting, camera settings, and shooting angles, can make colors in images appear different than their original color.
Photo editors or color correction service providers use various tonal and color adjustment tools in Photoshop to restore the original color of the photograph. They make changes in the exposure, saturation, white balance, contrast, and other settings to ensure overall color accuracy.
Color Grading vs Color Correction
Color grading and color correction are two distinctive photo editing techniques. Although both of these techniques are related to the color of the photographs, their final output and purpose are completely different. Some people get confused about these techniques and use these terms interchangeably.
Let’s discuss color correction vs color grading to know their differences.
Color correction is the process used to fix the color issues in images. The purpose of this technique is to make photographs look natural exactly the way we see through our eyes. This technique is used in eCommerce, the fashion industry, or other sectors where the components of the image should look like they do in real life.
On the other hand, color grading is an artistic technique where editors show their creativity. In this method, the color tones are manipulated to create different moods to build an emotional connection with the viewers. Editors can make the images look dramatic or muted, depending on their artistic vision.
How To Do Color Correction In Photoshop?
Do you want to know how to color correct in Photoshop? We are here to help.
There are several color correction techniques in Photoshop. In the following section, we’ve discussed two simple and easy color correction methods in detail.
Method 1: Choosing A Gray Color For Color Correction
This is one of the popular color correction methods professional photo editors use to repair color issues in photographs.
In this method, you have to select a gray area in your image. You need to make sure that portion is naturally gray in real life. In case your image doesn’t have any real-life gray area, select a part that is close to Gray. Photoshop will use this part as a reference to adjust the other colors.
Let’s learn how to do color correction in Photoshop using the Gray color selection method.
Step 1: Open the image file in Photoshop
First, open the image file in the ‘Document window’. Go to the menu bar, select ‘File’, then click ‘Open’. This will give you the option to select your image from your device.

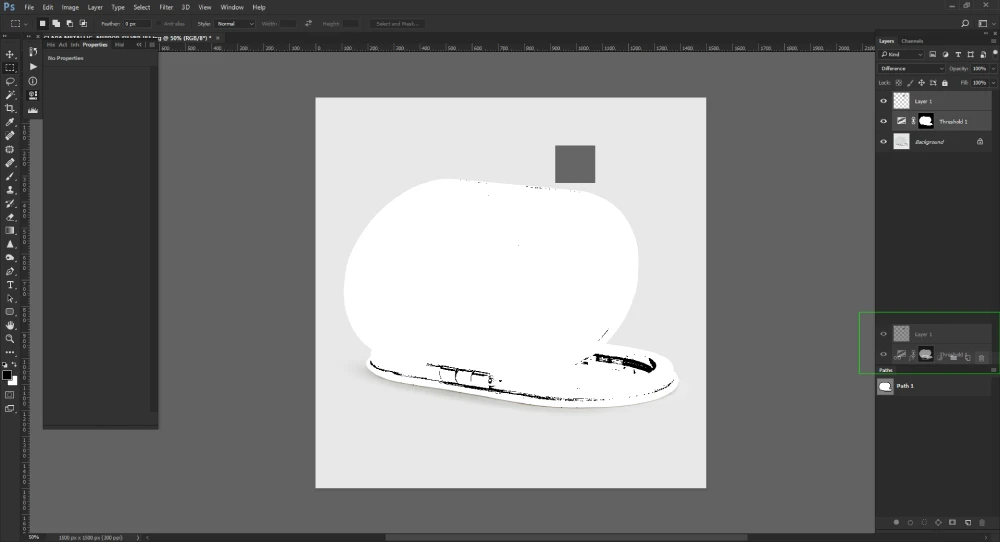
Step 2: Create Gray Layer
Now, you have to select the Gray reference. Click the plus sign on the Layer Panel to create a new layer.

To make the layer gray, Press ‘Shift+Backspace’ on your keyboard. A box will pop up on your screen. In the ‘Content’ menu, set 50% Gray and hit the ‘Ok’ button.
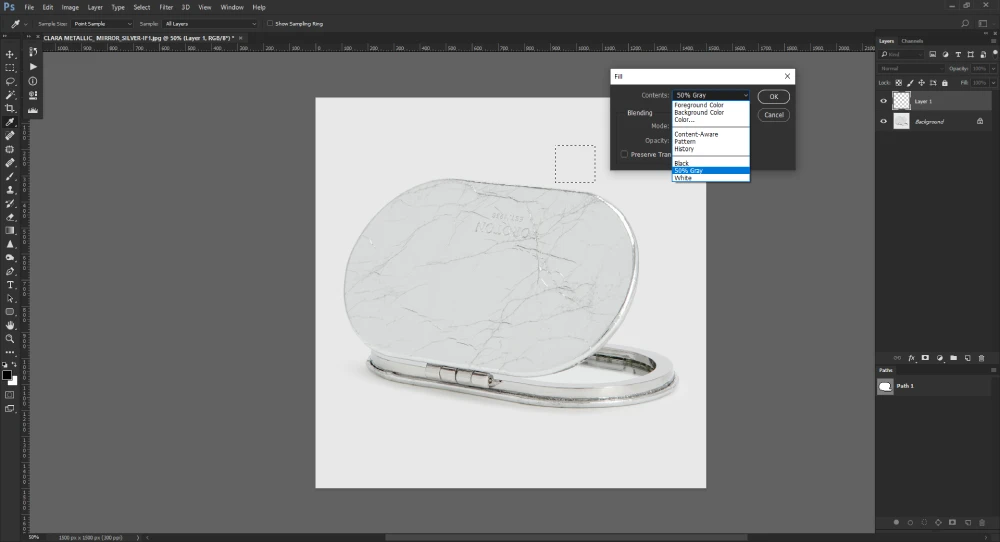
Now, go to the blending mode and select ‘Difference’.
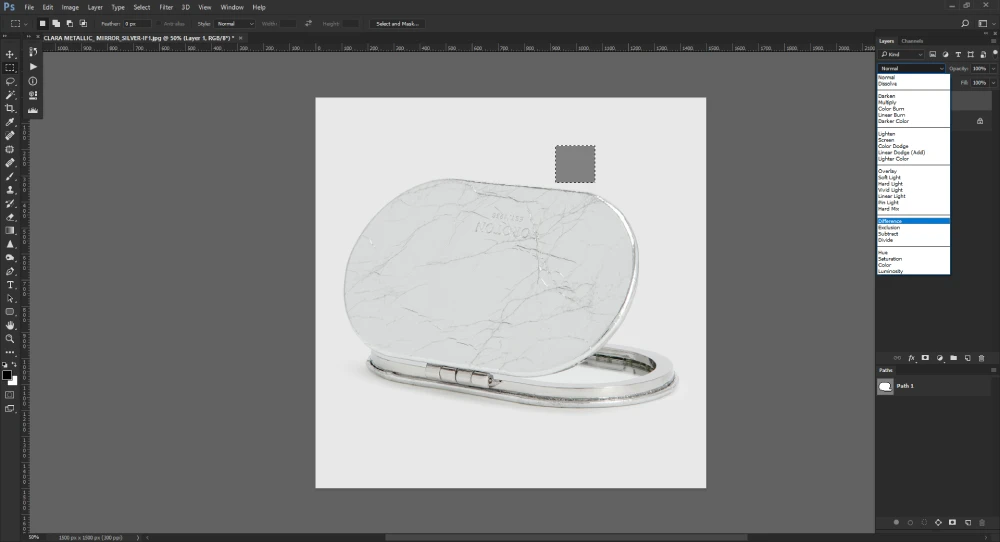
Step 3: Select the darkest area
Click on ‘Threshold’ from the Adjustment Layer, situated beside the layer mask icon. A diagram will pop up on the screen.
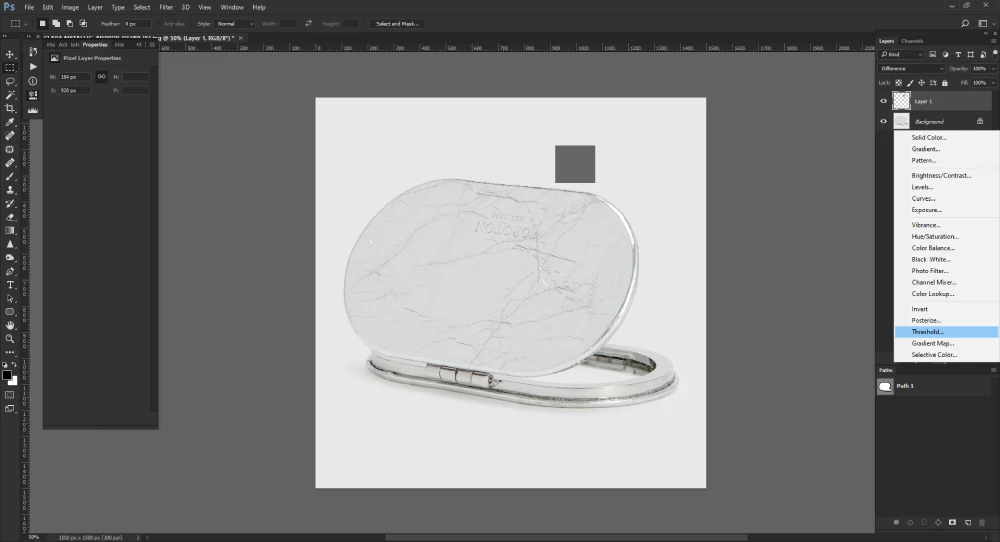
Now, you have to move the slider to identify the darkest area.
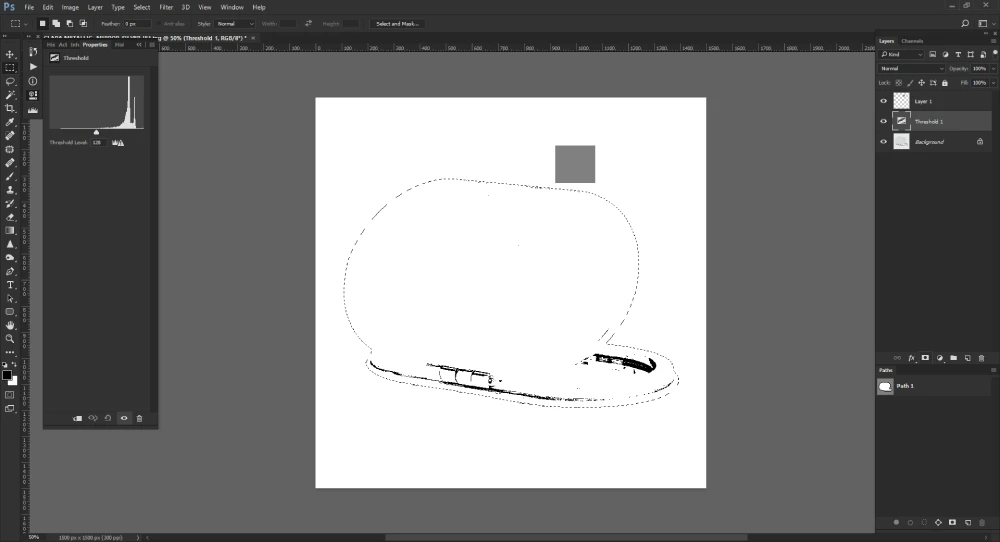
Step 4: Remove the layers
Except for the main layer, delete all other layers. For that, right-click on the layer and then click on ‘Delete Layer’.
Step 5: Select Curves
Click on ‘Curves’ from the Adjustment Layer.
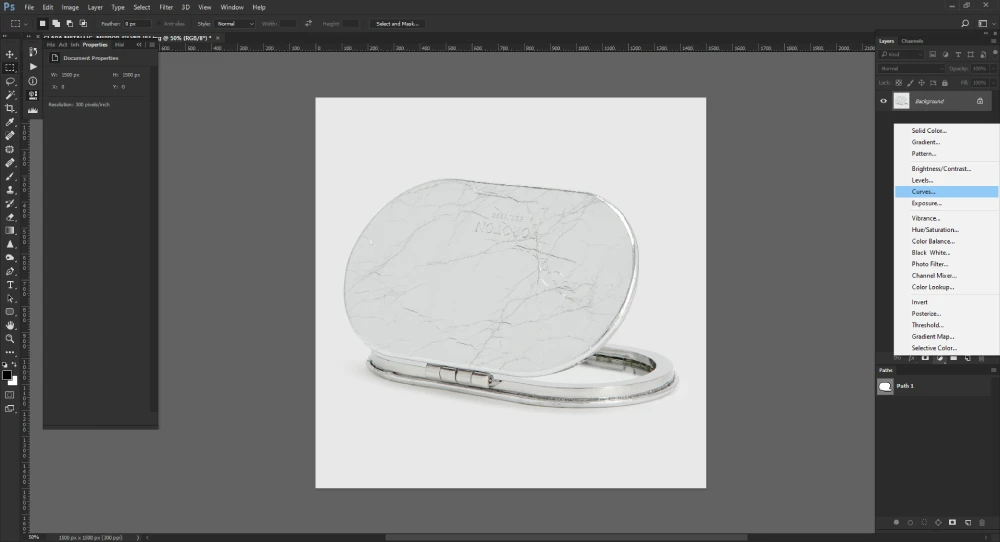
You will see 3 eye-dropper icons. Select the middle eye-dropper icon to select the gray point.
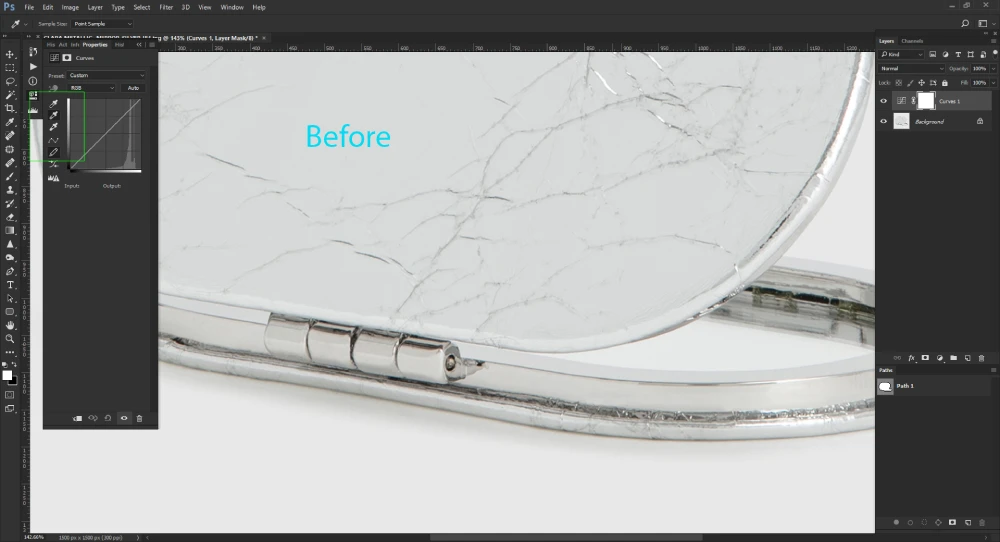
Step 6: Click on the darkest area
Use the eye-dropper tool to click on your previously identified darkest area. This will adjust the colors in the image.
However, it is important to note that this method may not work for all images. Despite using the darkest spot, the results may not meet your expectations. You can experiment with the other spots in the image to achieve your desired color tone.
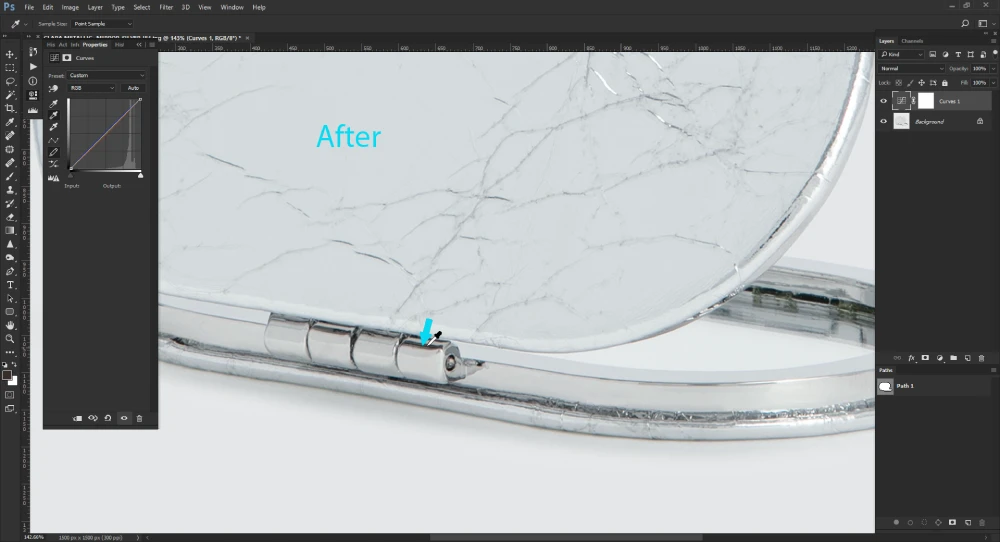
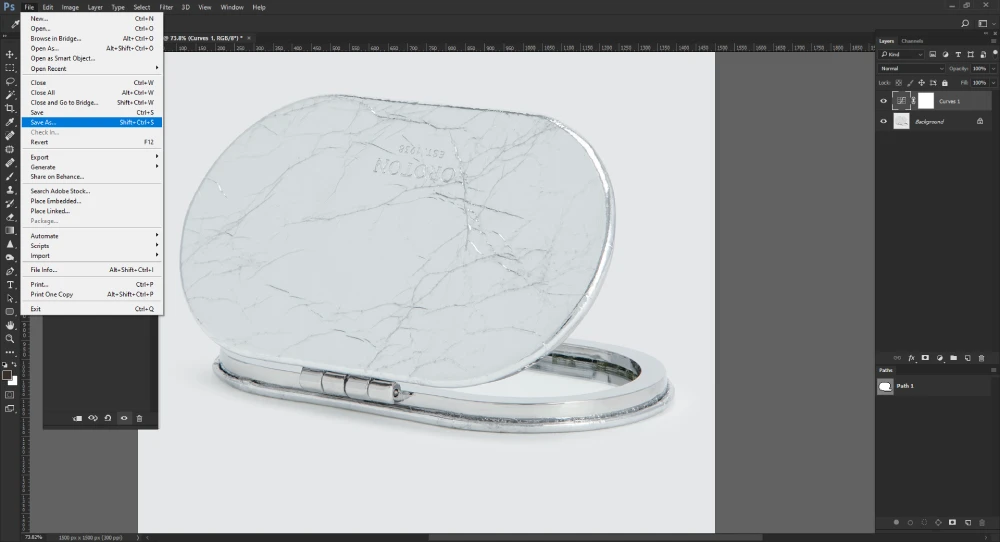
Step 7: Save the image
Go to ‘File’, click ‘Save as’, write your desired file name, and save it.
Here is the final outcome. See the difference?
Method 2: Color Correction with Color Balance
Color balance is another color correction technique in Photoshop. First, you need to have a basic understanding of color to use this color correcting method. If you know which color is causing problems in your image, you can fix it easily.
In this technique, you have to use complementary colors to balance the color cast issue. Now you might be curious about this complementary color theory.
So, let’s learn about complementary colors in detail.
Complementary colors are pairs of opposite colors. When these colors are combined, they neutralize unwanted color casts by producing a neutral gray or white tone.
The following are the contrasting colors in Photoshop.
Red – Cyan
When photographs appear too warm or reddish compared to their original color, they have a red cast. In this case, you have to increase the cyan in your photo to neutralize the color imbalance.
Green – Magenta
If your images look more greenish, they have a green cast. To make the images appear natural, you have to increase the magenta tone in the images.
Blue – Yellow
Photos that appear too cool or bluish have a blue color cast. To solve this issue, you have to increase the yellow tone in your image. In contrast, when your photos look more yellowish, increase the blue tone to neutralize the color cast effect.
Now that you have learned about the color tones you need to change, let’s explore the step-by-step guidelines for how to do color correction in Photoshop using the color balance technique.
Suppose the image you need to edit has a red cast. Use the following process to restore its visual appeal.
Step 1: Open the image file
Follow the same process mentioned in the previous technique.

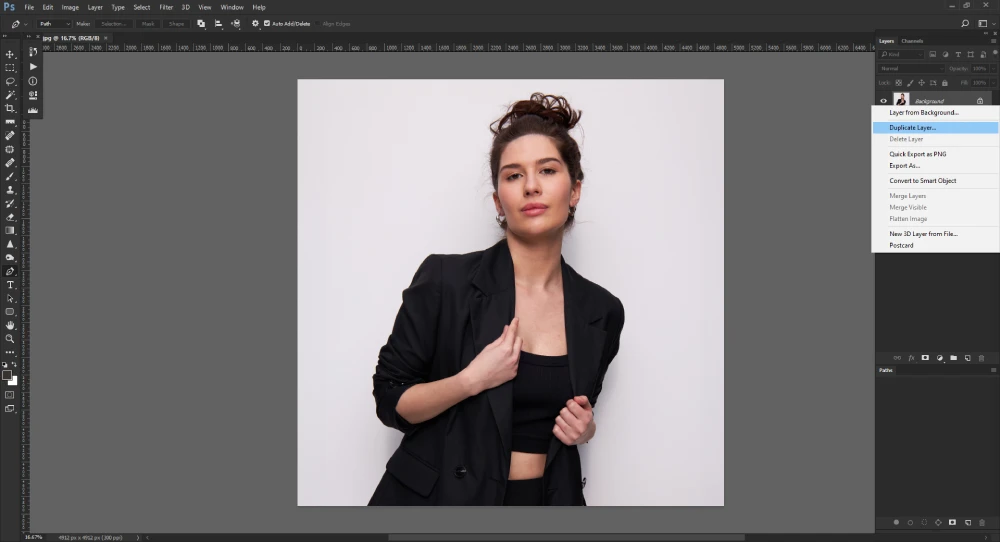
Step 2: Create a Duplicate Layer
Duplicate the background layer for backup. Right-click on the Background Layer and then click on the duplicate layer. You can also use the shortcut keys; Ctrl+J for Windows, and Command+J for Mac.
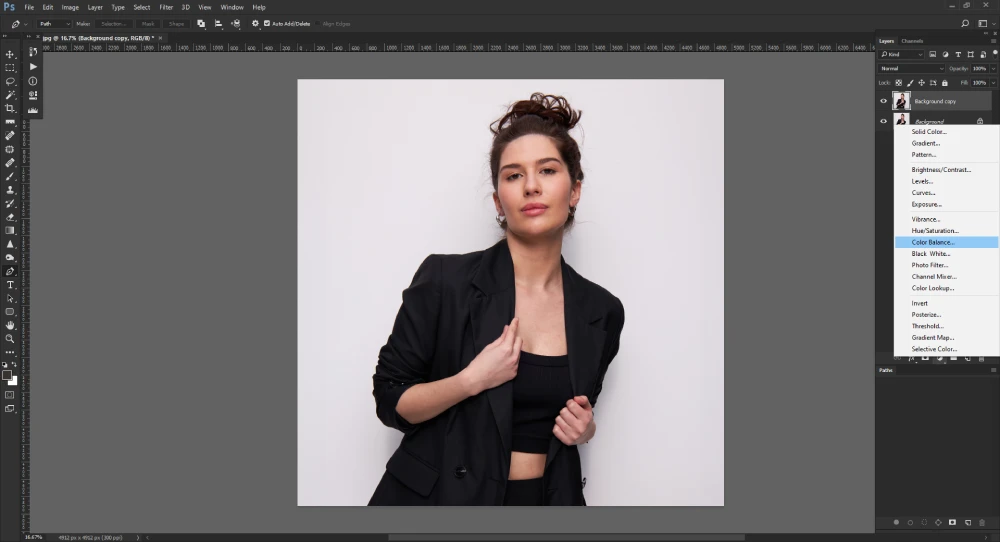
Step 3: Choose Color Balance
Beside the Layer mask icon, there is the Adjustment Layer. Click on it and then select ‘Color Balance’.
Step 4: Adjust the Slider
Look at this image. It has a visible red cast. You have to move the slider of the Cyan to remove the color cast. Increase its value until you feel the red cast is gone.
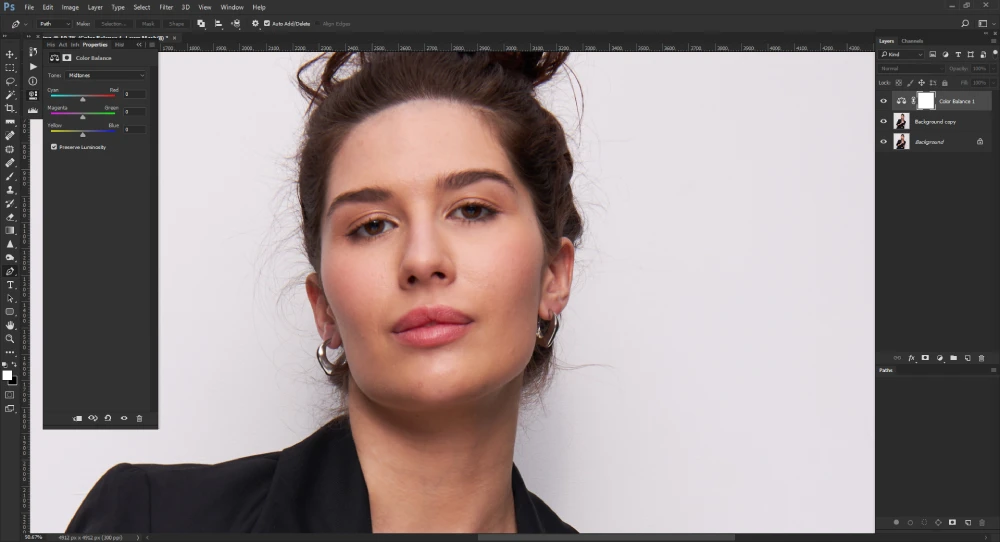
The adjustment of Cyan can create a Yellow cast. That’s why you have to adjust the slider for the Blue color.
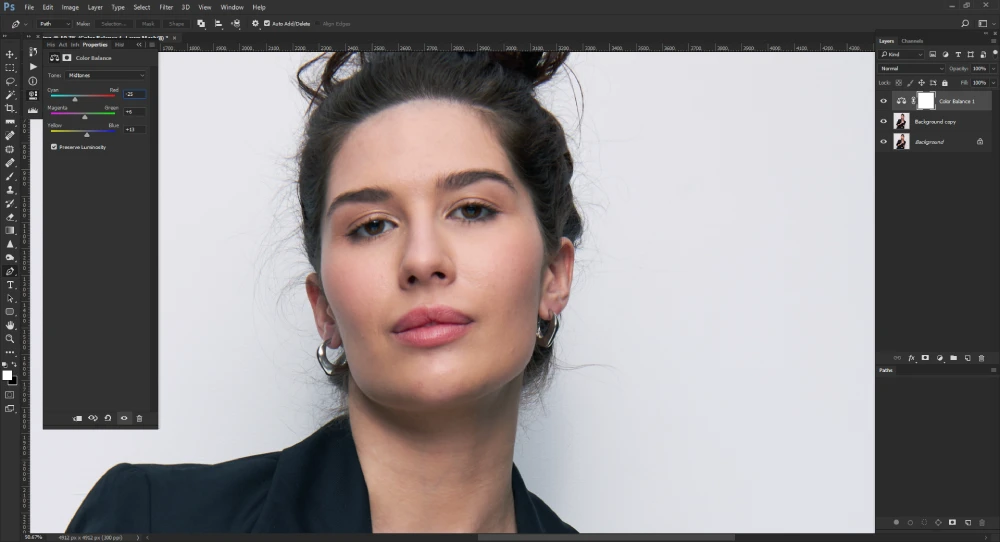
Step 5: Adjust the Brightness
From the Adjustment Layer menu, click on ‘Curves’.
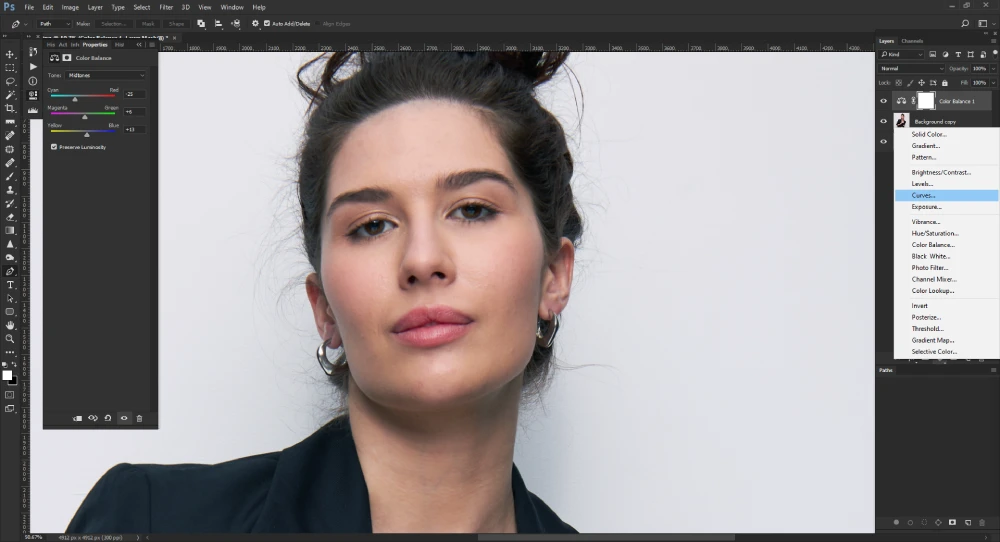
Use it to adjust the exposure level of the image.
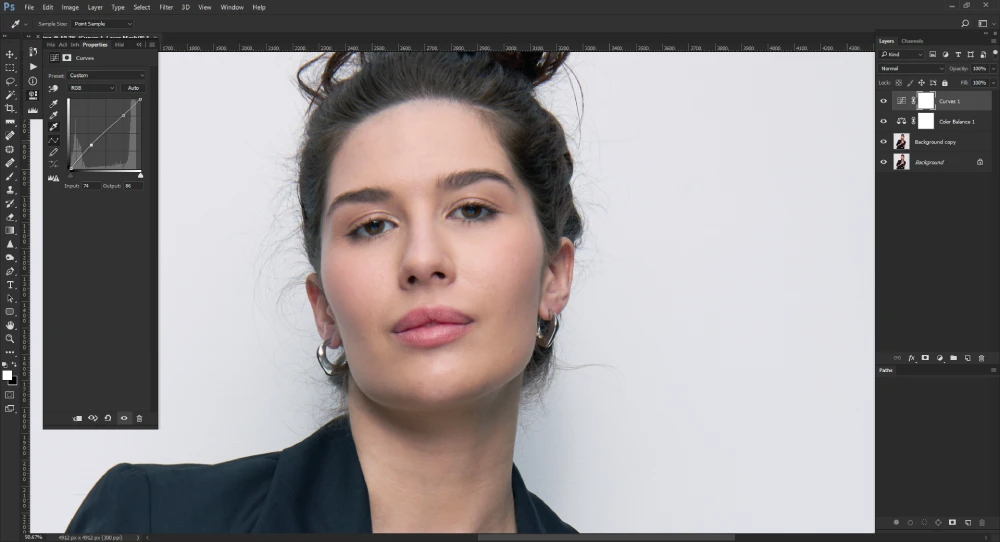
Step 6: Save the image
The last step is to save the image on your device. Go to ‘File’ on the menu bar and click ‘Save as’. Give the image file your desired name and save it in your preferred file format.
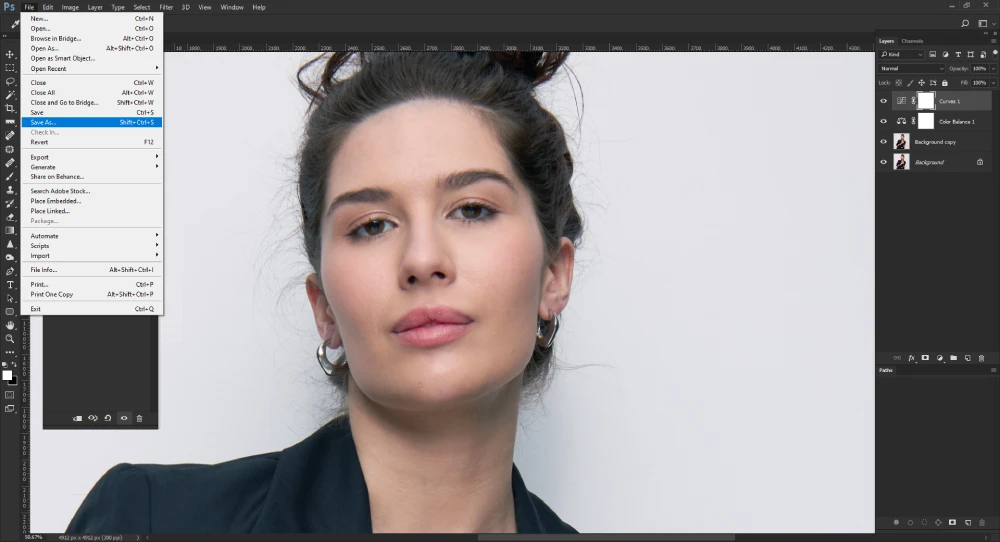
Look at the before and after look of the photo!
Isn’t this editing technique simple and easy?
Frequently Asked questions About Photo Color Correction
Why is color correction important?
Color correction is important to fix the color issues in images. Photographs often don’t turn out how they look in real life. This technique helps to make the images appear natural and consistent. In this technique, different features, such as contrast, saturation, hues, etc., are adjusted to bring back the natural aesthetics of images. The main purpose of color correction is to make the images look visually appealing and professional.
Are color grading and color correcting the same?
No. Color grading and color correction are different image editing techniques. Color correction is done to make the images look artistic. Editors use their creativity to manipulate the colors. They adjust various color settings to create different modes or styles. On the other hand, color correction is done to make images look natural. This technique is used to fix color issues and make images look realistic. It is also used to ensure consistency, accuracy, and the visual appeal of the images.
How much does color correction cost?
The cost of color correction depends on various factors, such as the complexity of the correction, the number of images, the experience of the photo editor, and so on. For basic adjustments, the lowest cost might be around $0.25 per image. However, you may need to spend more than $5 per image for complex editing. You can use color correction services from photo editing outsourcing companies to save money. They provide discounts for bulk orders.
Conclusion
Photoshop image color correction technique is a necessity for eCommerce industry. You can use color correction methods to make your product images look visually appealing and attractive to customers. Moreover, you can ensure the accuracy and consistency of your product. This will help you build a trustworthy relationship with customers.
Try out our abovementioned techniques in your upcoming project and show your customers the real color of your product.


